Installation
Setup
Operation
Operation from the command-line
Tips
Installation
Installation is simple – just double-click on the msi file & Next – Next – Next unless you want to change the installation path or who can use it:


Setup
Setup sites / accounts
There are three ways you can add site (or account) setup data to bounSky:
By hand
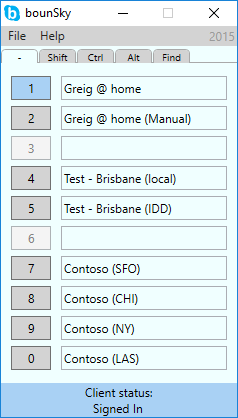
From the main screen, select File / Setup or click Control-S. This will launch the Setup form. Note there are nine tabs across the top – the first eight each contain ten sites or accounts. They’re shown here as sites 1-80, and on the main form the first four tabs align to sites 1-10, Shift 1-10, Ctrl 1-10 and Alt 1-10 respectively.
The Setup form will always open to the first tab with an empty site. Each row constitutes a separate “site” or a set of credentials for a user to sign in.
Enter a “friendly name” for the Site Alias, and then key the values that you would normally enter into the client. This image shows the relationships of each field to where they are in the Client:
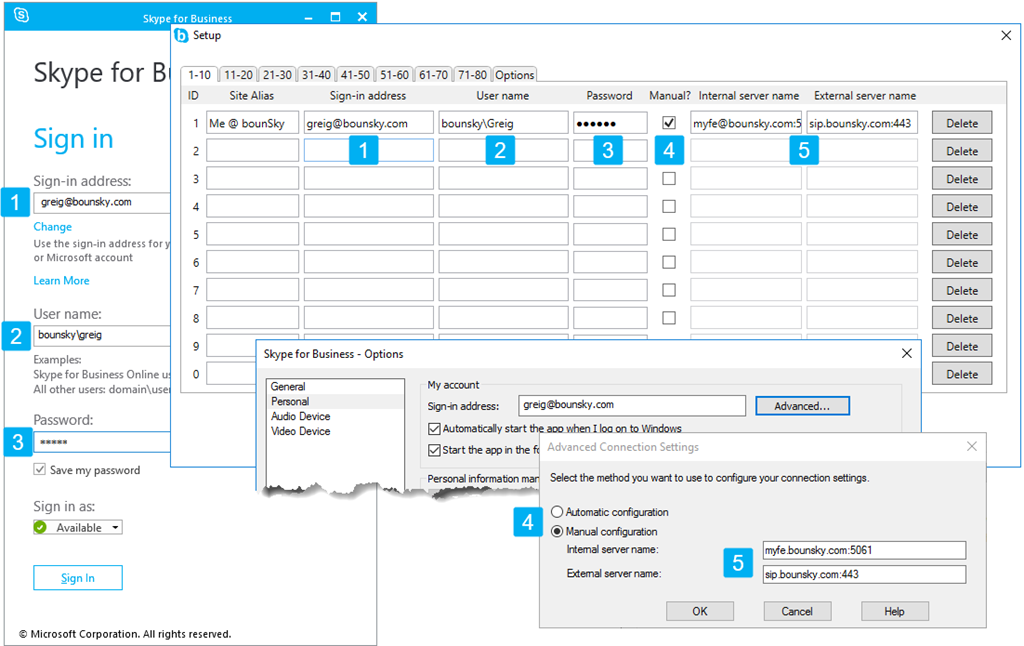
An auto-complete rule fires each time you tab off the sign-in address field, and this populates the user name. (It only does this if the user name field is empty). If the value’s not the right one for the site, simply edit it to show the correct value.
– On the “Options” tab you can select whether the auto-fill rule simply copies the sign-in address (required for Skype for Business Online) or uses the “domain\username” format required by Skype for Business on-premises.
If you’ve previously signed-in to this site on this PC and selected “Save my Password” you can leave the password field blank here, otherwise you’ll need to provide the password.
Navigate using mouse or keyboard to any other sites you want to add. You can drag-and-drop values (or control drag-and-drop to copy) but this will only work if the destination field is empty.
Your values will be saved when you OK to save the form. If you click Cancel or the “X” to close the form, all changes made on that visit to the form will be lost.
Import from Registry
A quick way of importing initial setup data is from the Registry. Simply select File / Import / from Registry. Note that only the SIP (sign-in) address & the internal and external server names come reliably from the registry. All other values – including the alias – are just ‘guessed’ by bounSky based upon the SIP address and you will probably need to change them.
Indeed, after an Import you should always visit File / Setup and refine the values. Perhaps change the Site Alias to something more useful to you, and double-check if the “Manual” check-box needs to be selected. (The internal and external server values will be dormant if Manual is not checked for that entry).
If you have used “Save my Password” when signing in as any of these users you won’t need to enter the Password for that site. bounSky will pass the sign-in address & user name to the client and it will do the rest for you.
Import from CSV
If you’ve previously Exported a CSV from another instance of bounSky or Profiles for Lync you can just import it here and all values will come across.
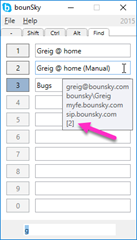
It’s also possible to hand-compile a CSV in Excel or your favourite text editor (mine’s NotePad++) and import that. Provided there’s at least a Site Alias and a comma on the line, bounSky will import it – but without a little more data that entry will be useless, and this will be flagged to you when you next visit the Setup form.
Greig @ home,greig@bounsky.com,bounsky\Greig,,False,,
Greig @ home (Manual),greig@bounsky.com,bounsky\Greig,,True,s4b2014se.bounsky.com,sip.bounsky.com
,,,,False,,
Test - Brisbane (local),BNE-LocalTest@greigin.sydney,greigin\BNE-LocalTest,,False,s4b2014se.greigin.sydney,sip.greigin.sydney
Test - Brisbane (IDD),BNE-IddTest@greigin.sydney,greigin\BNE-IDDtest,,False,s4b2014se.greigin.sydney,sip.greigin.sydney
,,,,False,,
Contoso (SFO),testuser-SFO@contoso.com,contoso\testuser-SFO,,False,,
Contoso (CHI),testuser-CHI@contoso.com,contoso\testuser-CHI,,False,,
Contoso (NY),testuser-NY@contoso.com,contoso\testuser-NY,,False,,
Contoso (LAS),testuser-LAS@contoso.com,contoso\testuser-LAS,,False,,
,,,,False,,
,,,,False,,
Setup Options
The last tab on the Options form provides a range of options for you:
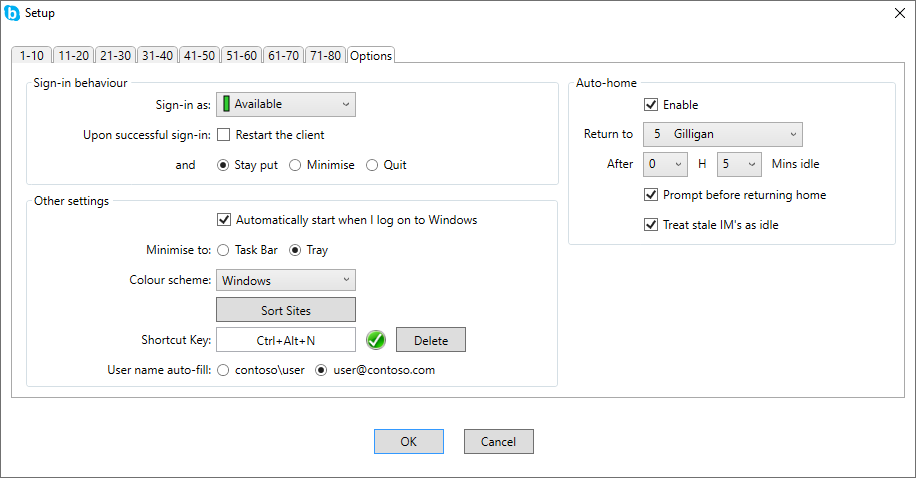
“Sign-in as”
Choose a presence state that will automatically be applied when you sign in. “Appear Offline” will only work if the account has that option enabled in its Client Policy.
“Restart the client”
The Office2013-based version of the client only checks the user’s user-interface value when it launches, not when the client signs in. With this unchecked, you are likely to encounter instances where the user’s Client Policy might state “EnableSkypeUI = $True” but you see the Lync UI, or vice-versa. Leave this option unchecked if you’re using the Office2016 client , as it only supports the Skype UI.
“Stay put, minimise, quit”
What action should bounSky take after it successfully signs you in to a new site?
“Automatically start when I log on to Windows”
If checked, this adds a registry key entry so that bounSky will launch when the user signs in to Windows. (It will always launch minimised, to whatever location you choose for “minimise to”, below).
“Minimise to”
When you as the user click “X” to close or Minimise, should bounSky minimise to the Task Bar or Tray?
“Colour scheme”
Choose the blue default scheme, or the Windows default scheme.
| bounSky Default | Windows |
 |
 |
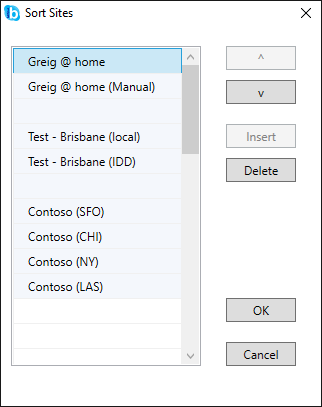
“Sort Sites”
Pops a box to let you re-order your existing sites plus remove or add gaps between them:
“Shortcut Key”
The Shortcut Key combination selected here will pop bounSky to the foreground or from the Tray at any time it’s running. Click in the box to the right and choose a keyboard combination of Shift, Ctrl, Alt and a single numeral or letter. Click “Test” to see if it’s free to use. If it is, a green ‘tick’ icon will appear, and if not a red “X” will show.
“User name auto-fill”
When entering a new site, an auto-complete rule fires each time you tab off the sign-in address field, and this populates the user name. (It only does this if the user name field is empty). This radio button pair lets you choose whether the default behaviour simply copies the sign-in address (required for Skype for Business Online) or uses the “domain\username” format required by Skype for Business on-premises.
Auto-home
The “Auto-Home” feature sets bounSky to automatically return you to your preferred “home” site / account after a period of inactivity on another. The countdown timer will count when you’re idle, and will reset as soon as a conversation starts, or when the Lync / Skype for Business client has the on-screen focus. (See “Operation” below for more information).
The options in this section let you define how this feature will work.
“Enable”
Turns the feature on or off.
“Return to”
Set the site you want to be returned to when bounSky auto-homes you.
“After”
Choose the time delay in 5 minute increments from 5 minutes to 23 hours 55 minutes.
“Prompt before returning home”
If checked, bounSky pops a confirmation message to you before returning home

“Treat stale IMs as idle”
If checked, open IMs that have been inactive for too long, or where the other party has closed the conversion window (yes, we can tell that from here!) will be deemed idle and the inactivity timer will countdown.
Operation
To bounce to a new site, simply click the site number concerned, or press the respective numeral on the keypad. Hold down one of Shift, Ctrl or Alt to flip to another group of 10 sites, then a numeral from 1 through 0 to select the one you require.
The Lync or Skype for Business client will pop to the foreground, the currently active user (if there is one) will be signed out, and the sign-in process will commence.
If nothing happens when you click or select the site, that’s an indication there’s insufficient data to attempt a connection, usually as the result of an import from CSV or the Registry. Visit the Setup form to check the data saved for that site. The OK button won’t let you leave the form if there’s incomplete data for any site:

Find
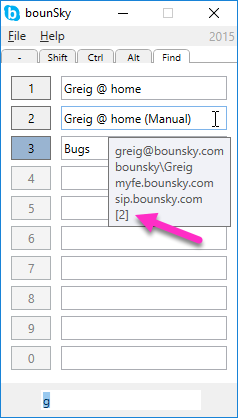
To switch to any of your “top 40” sites (those numbered 41-80) or to find a seldom-accessed site you’ve ‘lost’, use the “Find” feature. This is accessed by clicking directly on the tab labelled “Find” or typing Control-F.
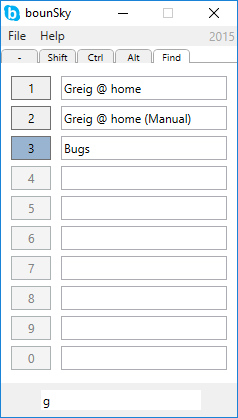
At the bottom of the screen the Client Status display will be replaced by a search box. Type the name of the site (the Alias) that you’re looking for. With each keypress the display will update showing up to ten sites that match the letter(s) you’ve typed. If the site you’re currently signed into is one of those, its button will change colour to indicate this.
To select a new site simply click on its numbered button. If you’re using the keyboard you need to tab off the search box first, then press the appropriate digit key. If your search has revealed only one site, simply pressing Return is enough for bounSky to change to it.
To abandon the Find process simply tap Escape, or select another tab.
Auto-home
The “Auto-Home” feature sets bounSky to automatically return you to your preferred “home” site / account after a period of inactivity on another. The inactivity timer – set on the Setup/Options form – will countdown when you’re idle, and will reset as soon as a conversation starts, or when the Lync / Skype for Business client has the on-screen focus.
When the feature is active and you’re signed into a non-home site, a stopwatch icon will be visible in the bottom left-hand corner of the main screen. Hovering the mouse reveals the current value of the countdown timer and gives options to Suspend or Disable the feature:
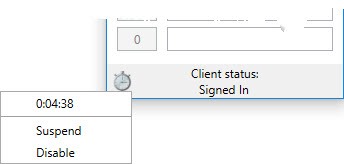
While auto-home is Suspended, the stopwatch has a red square next to it:
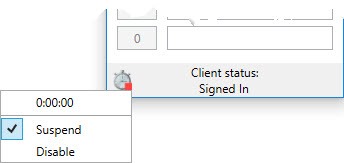
“Suspend” resets itself as soon as bounSky detects the client has been signed out. This lets you remain signed-in to a non-home site indefinitely without disabling the feature altogether. You can “un-Suspend” simply by hovering over the icon and clicking Suspend from the menu. (Note that Suspend will appear to falsely reset itself if you administratively re-home the connected user account to another pool/server, or any activity that will cause the client to drop and re-establish the connection).
If you choose Disable from the menu the Auto-home feature will be disabled. The stopwatch will disappear. To re-enable Auto-home, return to Setup / Options (shortcut: Ctrl-O) and re-enable it.
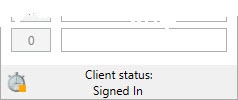
When a conversation is active and/or the Lync / Skype for Business client has the on-screen focus an orange square will reappear. Should Lync/SfB lose focus and there are no active conversations the orange box will disappear and the countdown timer will commence.
If selected under Setup / Options, bounSky will pop a warning before re-homing:
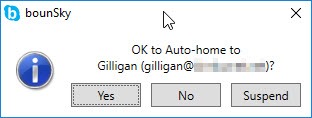
Choosing “No” restarts the countdown timer, while Suspend stops the feature operating for the duration of this session to that site/account.
Unfortunately try as I might, I’ve not been able to have this box pop without it grabbing the keyboard focus and stealing keys, potentially triggering an unwanted auto-home action. It’s on the wish-list for the next update.
Command-Line
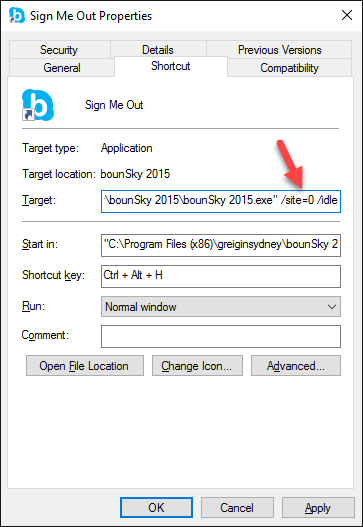
bounSky can even change sites simply by calling it from the command-line. Just call the executable and add “/site=nn” where “nn” is a number from 1 – 80. You can also select site 0 to just sign the user out. This is a great one to schedule at home-time each day!

If you’re automating this, it’s probably wise to add the optional “/idle” switch. If you specify “/idle” bounSky will abort without making the change if you happen to have any conversations active.
Another option is to create desktop shortcuts to your favourite sites, and to them you can attach a shortcut key combination:
 |
 |
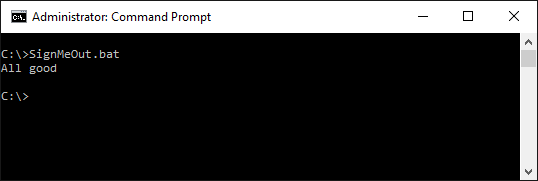
When called from the command-line, bounSky reports an exit code so that whatever called it knows what happened. If bounSky aborts a command-line operation because of active conversation(s), it will set its exitvalue/errorlevel to 1. In all other scenarios it will exit with a 0.
Here’s a VERY basic Batch file that demonstrates this capability:
@echo off
"bounSky 2015.exe" /site=0 /idle
if errorlevel 0 if not errorlevel 1 ECHO All good
if errorlevel 1 if not errorlevel 2 ECHO Aborted - conversations still active
Tips
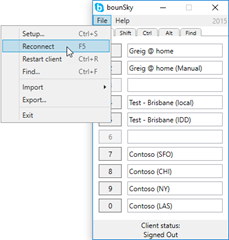
- Quickly dismiss bounSky to the Tray or Taskbar just by hitting Esc.
- If you lose track of the site you’re connected to, simply press F5. This drops and re-establishes the connection to the Lync / SfB client, and then updates the display of the currently-active (connected) site. (F5 is a shortcut for File / Reconnect in the menu). Note that this will only show the site if you’re signed-in to one of the lower sites (1-40).
- To help you with the management of up to 80 sites, hovering the mouse over a “found” site’s name (that is, while you’re on the Find tab) will reveal its site number in the pop-up text:
- If for any reason you want to exit and restart the Lync / SfB client, you can do that from the File menu and the “Restart client” option (Ctrl-R):